Typically I lie awake at night scheming about my future yard. I’m an unlimited fan of the comfy, quirky cottage yard style, which has lots of completely totally different flowers and even herbs and greens blended collectively in a single yard mattress. It’s as a result of historically, peasants who spent nearly all of their time working the fields for one more individual had merely small areas spherical their properties to develop their meals and herbs along with decorative flowers. There isn’t so much about medieval English peasant life that I want to emulate, nevertheless I sure love these gardens!
Now that I private a house, I’m pretty a bit nearer to attaining my cottage yard objectives, nevertheless I’m afraid that the yard hasn’t been my priority however. I’m crossing my fingers that subsequent yr I’ll get to start some extreme landscaping, nevertheless for now I’m sticking with my outdated standby, paper flowers.
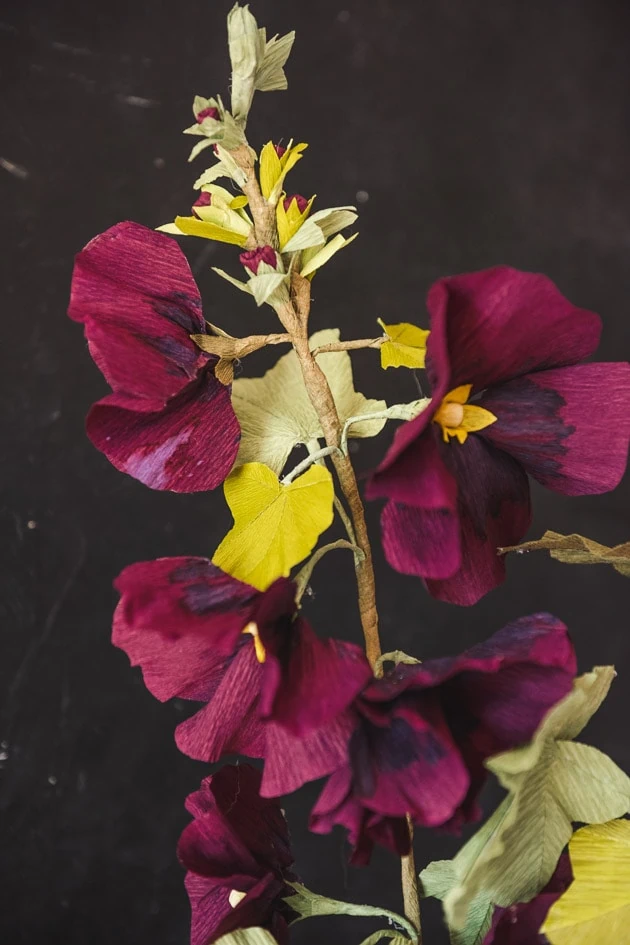
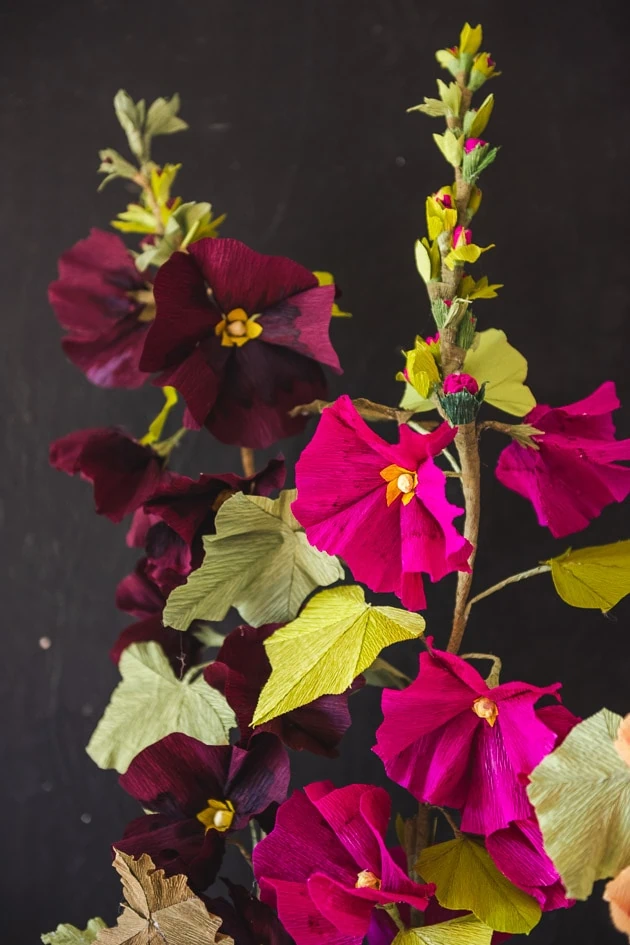
Hollyhocks are a staple in cottage gardens because of they’re so romantic and sweet. As well as they add lots of pretty peak to a yard because of hollyhocks can develop as a lot as six toes tall! There’s nothing like a big flower to make you feel akin to you’re in a fairy house, correct? Be taught on to find methods to make your particular person paper hollyhocks!
step pictures in a few segments:
-preparing provides
-making parts
-assembling
These DIY paper hollyhocks are part of my ongoing home enhance. As I’ve talked about sooner than on the weblog, I’ve been doing a complete lot of renovations since I bought my house last June. Lately I’ve been engaged on ending my upstairs toilet, and let me inform you–nothing motivates you to work on a large enterprise like having to utilize an unfinished toilet! 😬
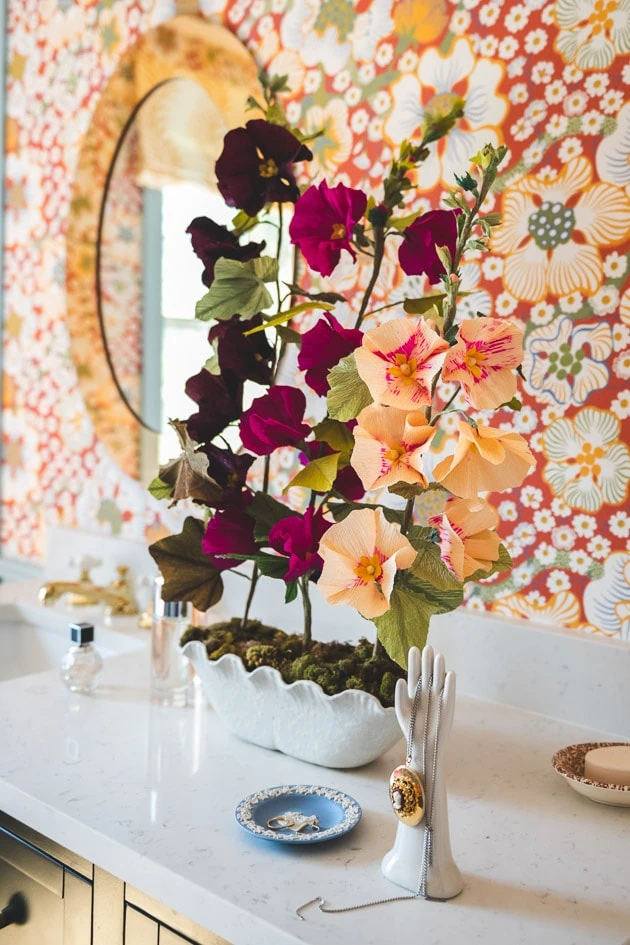
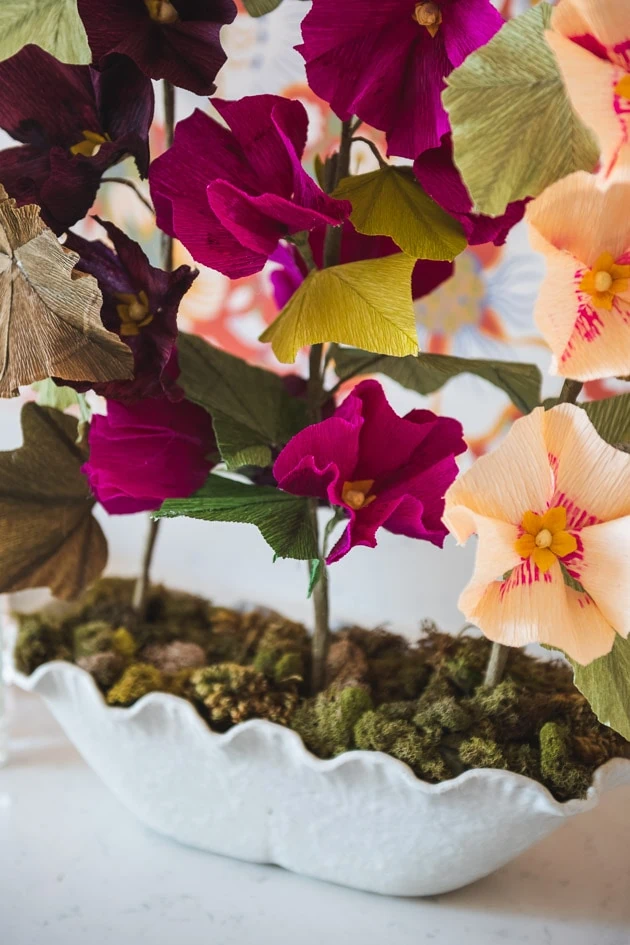
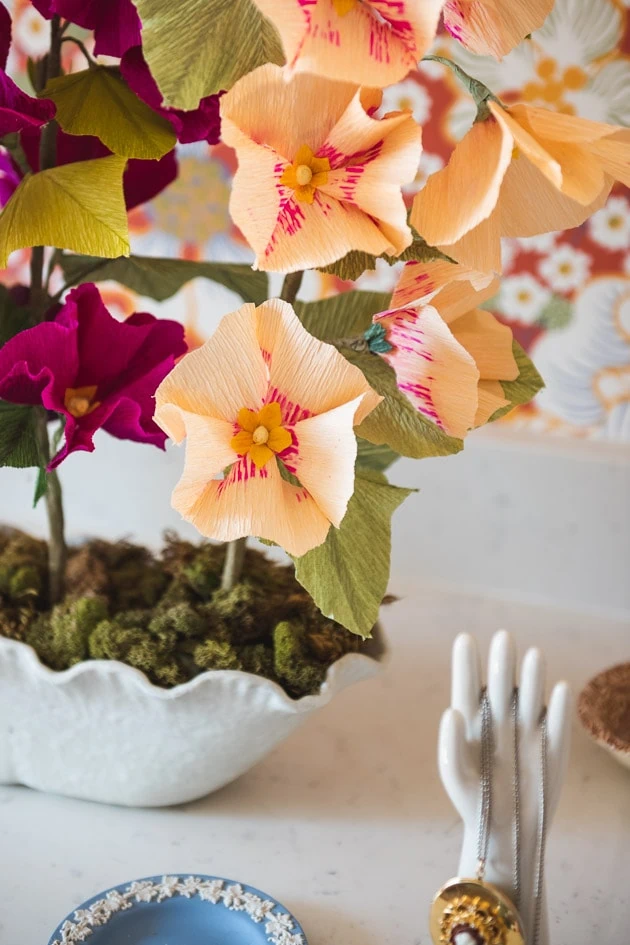
My toilet self-esteem has two sinks with a mirror above every, so I needed to make one factor pretty to go between them. Earlier this yr we made some paper pansies for the rest room and I actually like them so much that I needed to do one different flower. I decided on a few stalks of DIY paper hollyhocks, and I’m so glad I did because of these have IMPACT. The individual flowers are literally straightforward, nevertheless whilst you put the complete stalk collectively they’re fully show-stopping. I preserve pondering how pretty they could be as bridal flowers!
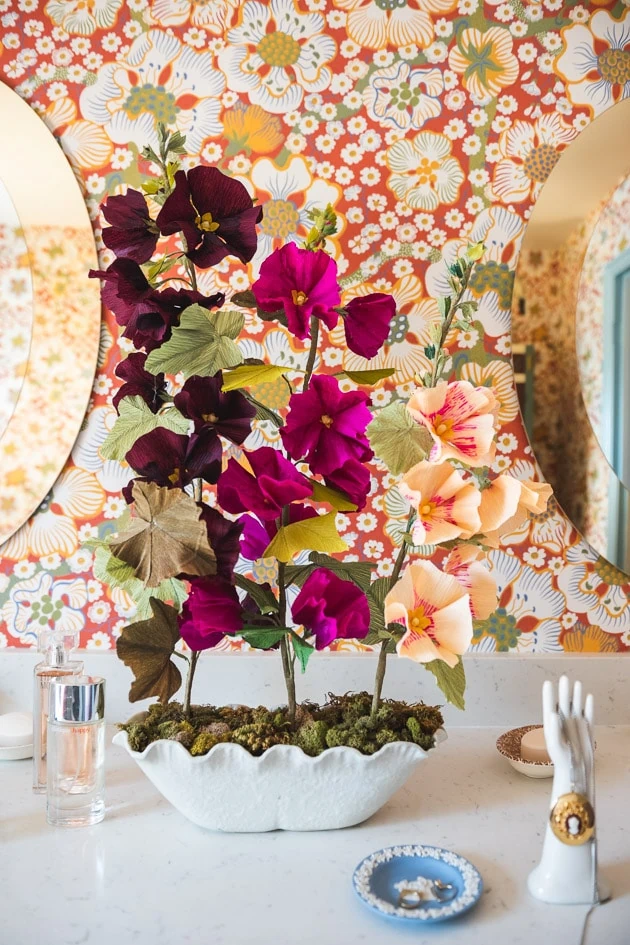
Observe alongside for the whole tutorial!
Make your particular person DIY paper hollyhocks
Provides
You’ll need our paper hollyhock template, crepe paper in various colors (I used darkish purple, indigo, peach, magenta, light yellow, darkish yellow, and a few colors of inexperienced), scorching glue, a glue gun, floral wire, 14 gauge wire, wire cutters, floral tape, scissors, and a paintbrush
Instructions
Put collectively your provides
- Get hold of and print our DIY paper hollyhock template (which you could possibly discover proper right here in our retailer!)
- Resolve what colors of flowers you want. I made blooms in three completely totally different colors, and each coloration used a main coloration and a darker stain coloration.
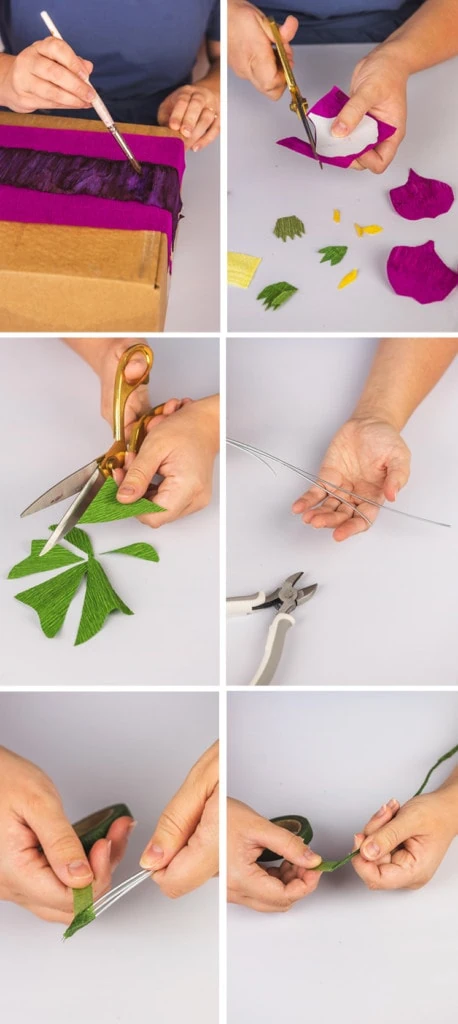
- Scale back your main hollyhock paper into 3 strips that are 5 inches broad and about 20 inches prolonged. Scale back your stain paper into 3 strips about 2.5 inches broad and 20 inches prolonged. Make sure that the grain of every of these strips is such that it stretches horizontally.
Put collectively your paper
- The next steps will stain your desk and fingers, so put down a little bit of thick butcher paper or cardboard must you’re engaged on a treasured ground and take into consideration sporting gloves!
- Tape the ends of the first petal paper down so that it lies flat on a desk. Tape the darker stain paper over the first coloration of paper so that it runs alongside the center of the broader purple strip.
- Dip a paintbrush in water and moist the stain paper solely. Then, press it down onto the first petal paper. It’s going to swap plenty of the darkish dye onto the first crepe paper.
- Repeat this collectively along with your totally different strips of paper.
Put collectively the objects
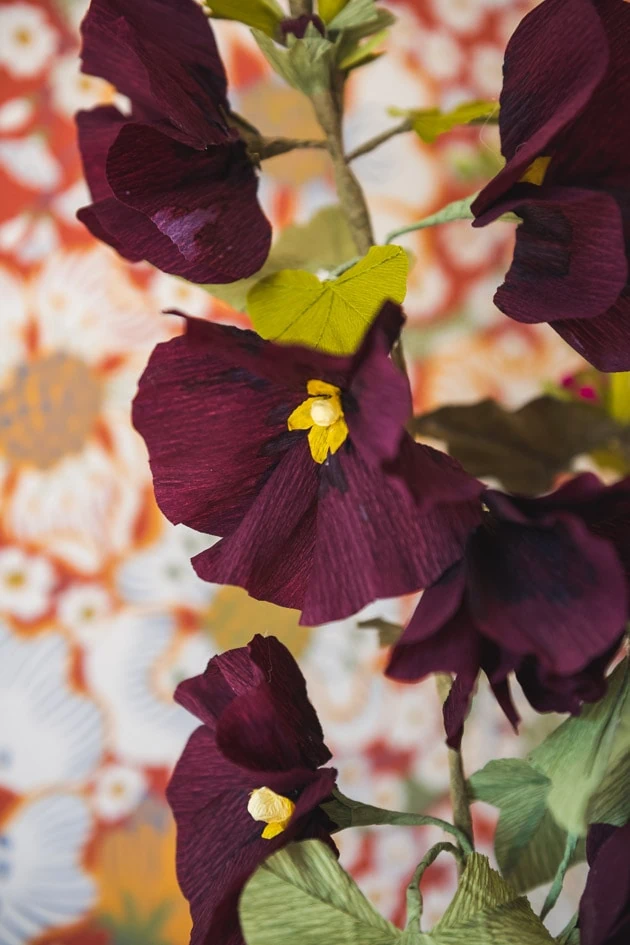
- Whereas your petal paper (say that 5 events fast!) is drying, decrease the rest of your template objects out. You’ll decrease the within petals out of darkish yellow paper, a stigma out of sunshine yellow paper, and leaves out of inexperienced paper. Each flower might have 5 petals, 5 inside petals, and one under-petal leaf piece.
- You may additionally decrease out purple rectangles of various sizes (the buds) and the bud leaves in inexperienced.
- As quickly as your petal paper is all dry, you probably can decrease these petals out. Set up them so that the dyed elements are on the slender base of the petal.
- Make a thick stem. Scale back three objects of 14 gauge wire to numerous lengths. The longest have to be barely shorter than you want your flower stalk, the middle one have to be about 2/3 that dimension, and the shortest have to be about 1/3 the scale of the first.
- Keep the three wires collectively so that all of them overlap on the bottom.
- Starting on the bottom the place all of them overlap, wrap the wires with floral tape. Wrap all the way in which during which to the highest of the longest wire, forming a protracted, stiff stem that narrows in the direction of the best.
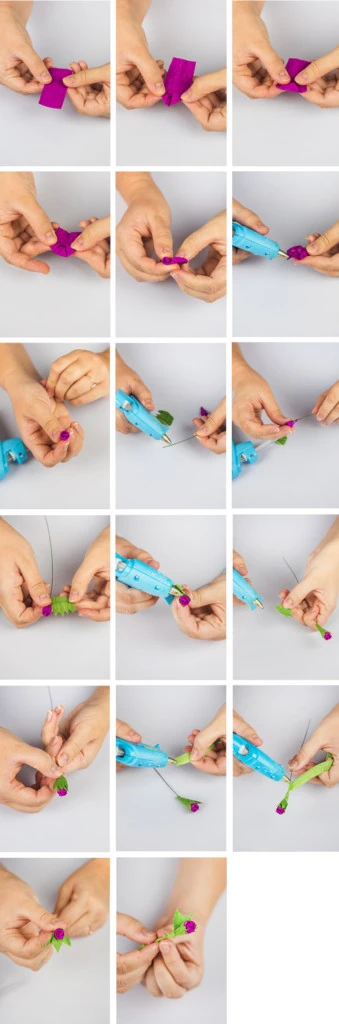
Make the DIY paper hollyhock objects
Flowers
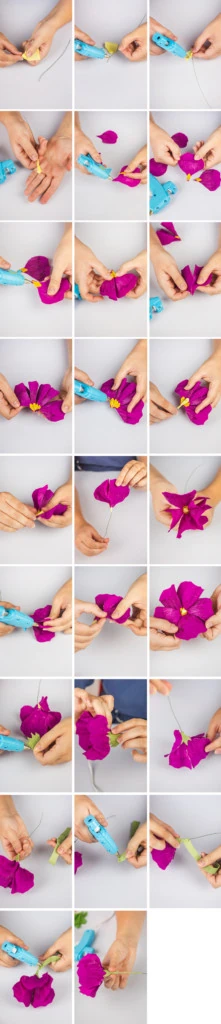
- Start with the flower’s stigma by crumpling up a small ball of crepe paper out of your scraps. Glue this to the tip of your frequent weight floral wire.
- Put a dab of glue on the center of the decrease out stigma sq. and put this on the crumpled paper. Fold down the ends so that it covers the crumpled paper, then secure with further scorching glue.
- Glue each yellow inside petal to the underside of a purple petal.
- Make a line of glue on the side/bottom of a petal subsequent to the yellow inside petal. Glue then subsequent petal to that first petal. Repeat for all 5 petals.
- Join your line of petals to the flower coronary heart so that they wrap evenly spherical, and secure with glue.
- Put a dot of glue halfway up the sting of each petal and fasten it to the one subsequent to it.
- Stretch the inexperienced under-flower leaf piece and glue it to the underside of the flower.
- Stretch a thin stem strip of inexperienced crepe paper and wrap it spherical your DIY paper hollyhock’s stem for 3-5 inches, securing with glue as you go.
- Repeat steps 1-6 until you might have your required amount of hollyhock blooms. I really feel that 5-9 blooms per stalk seems to be like lush and lifelike.
Buds
- To make the buds, decrease rectangles of purple crepe paper and fold the best corners in, then fold the best down repeatedly. Roll up the paper, then glue it to kind a rounded bud type.
- Stretch the bud leaves, then glue and wrap them throughout the bud along with a 5 inch piece of floral wire. Let plenty of the buds current further purple inside, whereas some have to be principally or all lined with inexperienced bud leaves.
- Glue a small leaf to the wrapped bud.
- Stretch a thin stem strip of inexperienced crepe paper and wrap it throughout the bud stem, securing with glue as you go.
Leaves
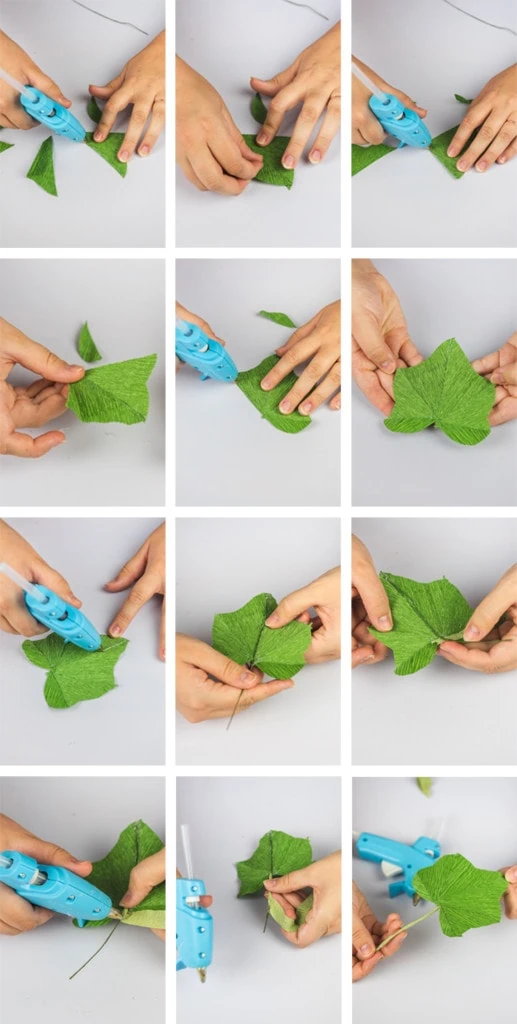
- To make the leaves, use the template to cut the 6 leaf objects out of inexperienced crepe paper. Simply make sure you’re lowering the objects with the grain, as confirmed on the template.
- With a thin line of scorching glue, join the leaf objects collectively. The leaf is an pure star-like type, nevertheless must you didn’t decrease with the grain of the crepe paper it acquired’t stretch correct.
- Stretch the paper barely to ruffle the perimeters and gives the leaf dimension.
- Glue a little bit of floral wire alongside one among many seams throughout the leaf.
- Stretch a thin stem strip of inexperienced crepe paper and wrap it throughout the bottom of the leaf and the wire stem for 6-7 inches, securing with glue as you go.
Assemble your hollyhocks!
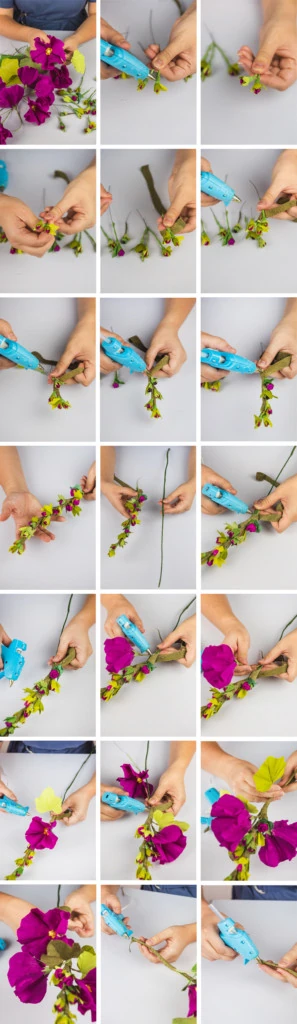
- Now you might have a complete lot of hollyhock parts on objects of wire. We’re going to put all of them collectively, starting on the prime of the stalk.
- Glue a bud to the stem of 1 different bud, then wrap the glued stems together with a stretched crepe paper strip, gluing as you go.
- Add further buds, gluing and wrapping with crepe paper. As you add parts, the stalk will get thicker and stronger, just like an precise flower!
- After you’ve added and wrapped the entire buds, it’s time to attach the thick stem. Glue the wrapped buds and wires to the best of the thick wire stem, then wrap with crepe paper. Maintain securing the crepe paper strips with glue as you proceed this.
- It’s time to start together with your completely bloomed flowers! Glue a flower’s stem and a leaf to the stalk, then wrap with a crepe paper strip.
- Proceed together with flowers and leaves to the stalk as you are employed your technique down. You want to home them out with a few inches between every.
- In case you’ve further leaves after you add your entire flowers, add them to the underside of the stalk. Wrap them with a crepe paper strip, just like you most likely did for the prior leaves. It’s essential to go away about 5 inches of stem with out flowers and leaves on the bottom of your stalk.
- After you finish together with your entire flowers and leaves, proceed wrapping a crepe paper strip all the way in which during which to the underside of the stalk. Protected with glue, then decrease the strip.
- Voilà! You’ve got a gorgeous stalk of hollyhocks! Make a few stalks in quite a few colors, then put together them nonetheless you need in your private indoor cottage yard.
Further paper flower inspo
In the event you occur to preferred this tutorial for DIY paper hollyhocks, you then’ll love our totally different paper flower initiatives! Check out our DIY paper peony, DIY paper foxglove, and this roundup of all our favorite paper flower initiatives. And must you agree with me that these paper hollyhocks may be pretty as bridal flowers nevertheless aren’t purchased on paper over precise, then attempt these fairly paper bouquets impressed by the royal marriage ceremony ceremony, white peonies, Cinco de Mayo, and spring coloration.